


Changelog (2026/06/12)
Other products:
SplineEQ, a spline-
based linear phase
equalizer plugin.
Spiral, a musical
spectrum analyser.
The Sound of Fractals & Photographs
Instrument isolation
Instrument synthesis
Introduction to editing
Introduction to the editing tools
The list below details a few ways to reproduce classical audio processing effects using Photosounder's editing tools.
Generally the sound on which the effect will be applied will be known as Layer 0, the layers above being created and used to apply the desired effect. When the use of the lossless mode is recommended it is only when the effect is applied to a loaded sound. The use of the lossless mode isn't recommanded when the lossless processing algorithm cannot be expected to give a satisfactory result.
Equalisation
Basic effect
Filtering in Photosounder can simply be done by multiplying (menu Layers > Multiplication) two layers together, one of the layers being the sound to be filtered, the other one being the filter. This works by multiplying the respective intensities in frequency and time of each layer. Knowing this and using the editing tools available in the program we can first create an equalisation curve and use it to filter a sound.
Create a new layer (menu Layers > New Layer) then select the White paint spray tool and start drawing a vertical curve, knowing that the left edge of the image represent 0 (complete silencing of that frequency) while the right edge represents the maximum amplification. Once done drawing the curve, fill it up (menu Operations > Fill from Maxima to Left), average it (menu Operations > Horizontal Average) then finally set the layer's blending mode to multiply (menu Layers > Multiplication).
For best results the use of the lossless mode is recommended.
Going further
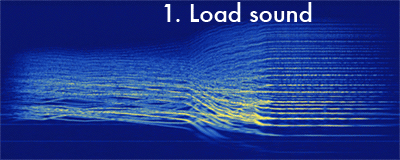
You can also use the sound's own frequency profile as a visual reference. After loading the sound, duplicate it (menu Layers > Duplicate Layer) and turn it into curves (menu Operations > Horizontal Curves) that represent its frequency profile as shown in the image below :

Using this visual aid you can go further by designing the equaliser backwards, that is, instead of drawing the correction you want you draw the bias you want to remove. To do so simply draw a curve that follows the approximate shape of the sound's frequency profile curve. Once you're done, fill it as done previously and average it, but this time either set the blending mode to divide (menu Layers > Division) or keep it to multiply and invert (menu Operations > 1 / x, not to be confused with the other command named invert that instead does 1 - x) the layer. This causes the bands of frequency that were identified as weaker during the drawing of the curve to be boosted and the stronger bands to be dimmed to both about the same level. Note that you may want to do another equalisation on top of it to give your sound the frequency profile you want.
There is yet another equalisation technique, this time much more direct. You can equalise the sound directly by editing its frequency profile curve. This is quite convenient for removing undesirable peaks in frequency. Starting from a freshly loaded sound, duplicate the sound and turn the duplicate layer (Layer 1) into horizontal curves as done previously. Then, go back to the layer (Layer 0) that represents the original sound, and equalise it (menu Operations > Horizontal Normalisation). This has for effect of making the frequency profile of that layer flat, in other words every band of frequency has the same intensity. At this point we've effectively separated one characteristic of the sound (its overall frequency profile) from the rest of the sound, and we could combine them back together again by averaging horizontally Layer 1 and multiplying it with Layer 0. Knowing this you can transform Layer 1 to for example cut peaks or remove noises (for example by moving (using the Move tool) the layer to the left so that the background noise is cut off) and when you're done with editing this layer you can average it and make sure its blending mode is set to multiply to hear the sound with its new modified frequency profile.
Envelope
The vertical equivalent of the three equalisation techniques described above can be used to apply an envelope to a sound, correct the envelope of a sound or directly edit a sound's envelope. The only changes in the techniques consist in using the vertical operations equivalent to their horizontal counterparts.
For best results the use of the lossless mode is recommended. Also prior to loading the sound it is recommended that you either select Constant Time Resolution Analysis in the Options menu, or set min_bpo to 0 in the config.txt file, to ensure that the envelope matches more closely to the real envelope of the sound.
Compression, expansion, limiting, noise gating
Once again, the use of the lossless mode is recommended for the effects below.
Simple compression
As explained above, you can separate a sound's envelope from the rest of the sound, work on that envelope separately and then re-apply the modified envelope the your flat-envelope sound. To do so, duplicate (menu Layers > Duplicate Layer) the sound, then vertically normalise (menu Operations > Vertical Normalisation) the original layer (Layer 0), and average (menu Operations > Vertical Average) Layer 1. At this point Layer 0 represents your original sound except with a flat envelope, while Layer 1 represents that envelope. If you set Layer 1's blending to multiply (menu Layers > Multiplication) then what you hear and see is the same as the original sound. Note that you might want to keep a copy of Layer 1 in case you want to start again from an unmodified envelope.
The simplest thing to try is to change the gamma (the Gamma knob) of the envelope layer. Moving the gamma knob to the left expands the envelope to give it more dynamic range, while moving the gamma knob to the right compresses the envelope, and turning it all the way to the right gives it almost a flat envelope.
Basic limiting, noise gating
The envelope can also be limited so that its top intensities are limited in volume. There are two ways to go about doing this. The first one is the create a new layer (meny Layers > New Layers) above the envelope, invert it (menu Operations > Invert) as to fill it with white, set that layer's blending mode to minimum (menu Layers > Minimum) and to tweak the cutoff point using the Layer intensity knob. When you're done do not forget to merge (menu Layers > Merge Down, on Layer 2) Layers 1 and 2. The other way to do it is to turn Layer 1 into curves (menu Operations > Vertical Curves), then to cut the top peaks (either using the spray tools, the rectangle tool or the Move tool by shifting the layer upwards so that the peaks are cut off by the image's top edge) and vertically average the layer again.
You can use the same type of approach to do noise gating, that is to silence all sounds below a certain threshold of volume. The two ways to do this are identical to the aforementioned limiting methods, except for two details. For the first method, instead of setting Layer 2's blending mode to Minimum it should be set to Subtraction. For the second method, instead of moving the curves up they should be moved down, or the bottom end of the layer should be blacked out.
Compression with threshold and ratio
The gamma is however just one way to compress the envelope, a more conventional way to compress works by defining a threshold above which the compression should take effect, and a ratio representing how the volumes above the ratio should be reduced. One way to do this is depicted in the image below :
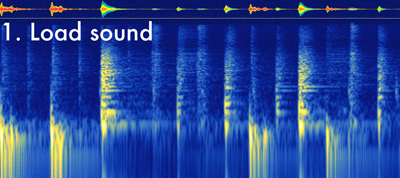
After loading the sound, duplicate it to a new layer, turn the duplicate layer to curves (menu Operations > Vertical Curves) that represent the envelope, then create a new layer on top of the envelope. It's on that layer that the threshold and ratio are decided and graphically approximated by first drawing (using the White paint spray tool) a straight vertical line from the bottom edge of the image up to a height that matches to the threshold. Then the curve should still upwards but to the left, how fast it reaches the left edge of the image defines what can be thought of as the ratio. Note that since in classical compressors the ratio is defined as a logarithmic function and that we're drawing curves in linear space then the curve above the threshold should be curved to the left to best approximate a logarithmic ratio. Then, fill the curve (menu Operations > Fill from Maxima to Left), then horizontally average, set its blending mode to Multiplication and merge the curve layer down (menu Layers > Merge Down) with the envelope layer. Do a vertical average and set the blending mode to Multiplication. Lastly, don't forget to flatten the original sound's envelope by doing a vertical normalisation on Layer 0.
Multiband compression
Separate compression on several frequency bands can also be done using a variation of the methods outlined previously. The basic idea is to blur the image vertically instead of averaging vertically an entire sound to obtain its overall envelope, thus grouping nearby frequencies together to obtain the envelope of a wide frequency band.
After loading the sound, duplicate it to a new layer, create a new layer on top of it. Using the white spray tool, make a single large point on that layer. What matters is that the point is quite large. A good rule of thumb is that the cross-shaped cursor should span over two octaves or more. If it spans over two octaves in means there will be one band for compression roughly every octave. Horizontally average that layer then set its blending mode to vertical propagation (menu Layers > Vertical Propagation), then merge it down with the layer below which is a copy of the original layer. Now you have the original layer and on top of it a vertically blurred version of it. You can think of this layer as representing envelopes on multiple bands. Set its blending mode to Division, this will make it flatten the envelope of each individual wide frequency band that we are trying to compress, duplicate it, set the duplicate's blending mode to multiply. At this point the two upper layer cancel each other out and the result is unchanged from the beginning. But now by modifying the upper layer (for example by modifying the gamma) you can do a multiband compression on the whole sound.
The rest of this page is under construction, more will come later.
Vocoding
Tremolo?
Distortion?
Noise reduction
Wah-wah effect
Subtractive synthesis
De-essing
Chorus
Flanging
Pitch-shifting
Pitch correction
Doppler shift
Wow/Flutter
Vibrato
Arpeggio
Echo
Reverb?
Convolution
Envelope follower
Side-chain compression
Crossover
Automatic gain control
Echo
Echo
Echo